Chat

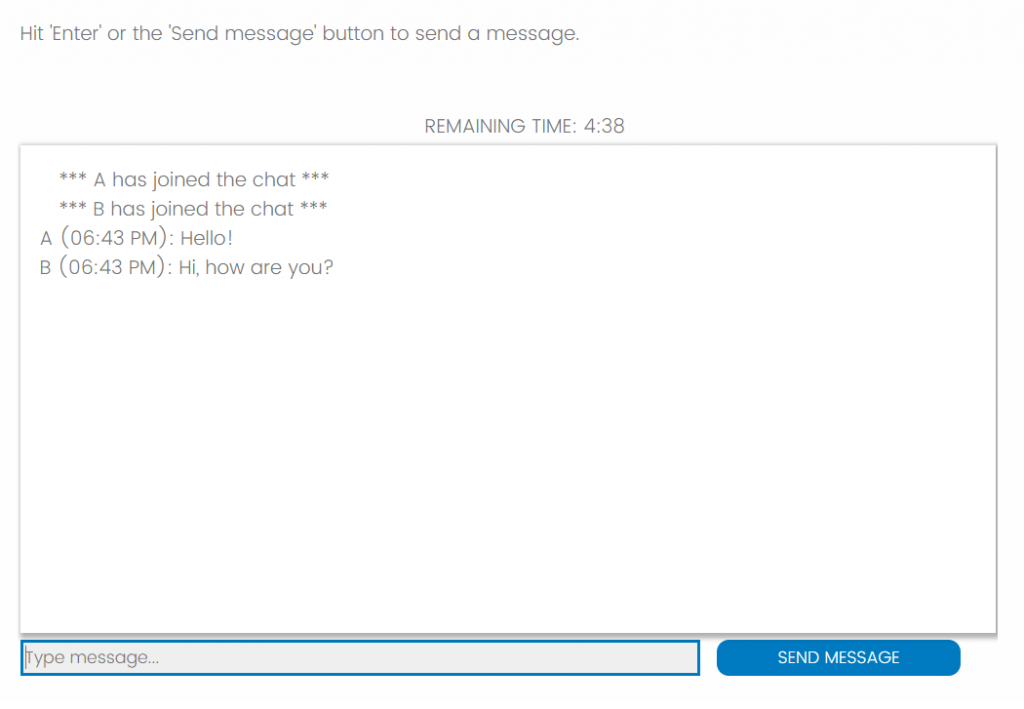
SMARTRIQS allows real-time communication between participants. Any number of participants in a group can participate in chat. The chat feature is highly customizable: researchers can set up multiple chat stages within one study, allow chat between certain participants only (e.g., based on role or decision), and add time limit to chat. Furthermore, researchers can customize the visual layout of the chat window (e.g., width, height, time format, instructions). Chat logs are saved in Qualtrics in a user-friendly format.


The CHAT block

Required variable

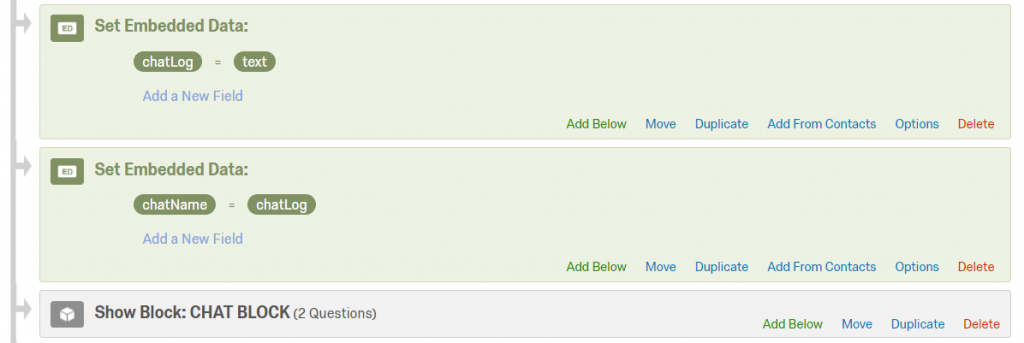
chatName The name of the embedded data variable in which the chat log will be saved. Participants will see this chat log and can submit their messages to this log. A convenient way is to name the chat after the participating roles and the stage. For example, if role A and role B are chatting in Stage 1: “chatLog_AB_1”. If there is only a single stage of chat and every role in the group is participating in it, you can simply name it “chatLog”. Note: when you define the chat log embedded data, it can’t be empty — you should put some placeholder text (for example “text”) in it.

Optional variables

You can use the following optional variables to customize the chat:

chatInstructions Changes the instructions above the chat window to any string that you specify. Please avoid double quote characters (“) in this string. Double quotes break the script. Use single quotes ( ‘ ) instead. If this embedded data is not set, the default instructions are used (“Hit ‘Enter’ or the ‘Send message’ button to send a message.”)
chatWindowWidth Use any integer between 400 and 1200 to define the width of the chat window, in pixels. If this embedded data is not set or invalid, the default value is used (600).
chatWindowHeight Use any integer between 240 and 720 to define the height of the chat window, in pixels. If this embedded data is not set or invalid, the default value is used (360).
chatDuration Use any integer between 10 and 600 to define the duration (time limit) of the chat, in seconds. A timer will be displayed, indicating the remaining time until the limit. The chat automatically ends and the study proceeds to the next stage after this limit. If this embedded data is not set or invalid, there is no time limit and the timer is not displayed: participants can chat as long as they wish (or quit the chat at any point).
allowExitChat If this is set to yes, the ‘Exit chat’ button is displayed, even when there is a time limit, to allow participants to exit the chat before the time limit expires. If this embedded data is not set or invalid, the ‘Exit chat’ button is hidden. Note that if there is no time limit, the ‘Exit chat’ button is always displayed.
chatTimeFormat Set the format of the time stamps. Possible values: hms24: hour-minute-second in 24-hour format; hms12: hour-minute-second in 12-hour format; hm24: hour-minute in 24-hour format; hm12: hour-minute in 12-hour format. If this embedded data is not set or invalid, the default format is used (no time stamps).

Sample settings

Sample custom setting #1 — large chat window with timer

The first example shows the setup of a custom chat block with larger-than-default chat window (800 x 400 pixels), and a 5-minute (300 seconds) timer. The time stamps are formatted to 12-hour time format, and only the hour/minute is displayed. Since we did not define allowExitChat, the ‘Exit chat’ button will be hidden, and participants will not be able to quit the chat before the 5-minute timer is up.


Sample custom setting #2 — small chat window with timer + custom instructions

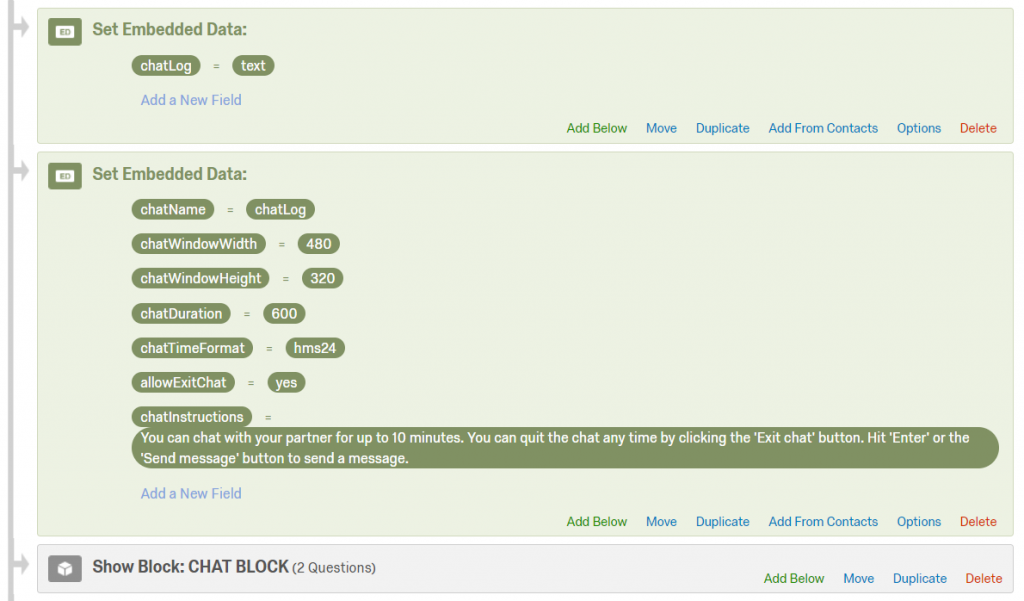
In the second example, we use a smaller-than-default chat window size (480 x 320 pixels) and the 24-hour time format with seconds displayed. The timer is 10 minutes (600 seconds), and we allow participants to quit the chat before the timer is up. We also use custom instructions.


Sample custom setting #3 — chat interrupted by some other task

In this example two people chat (no time limit), then they do a task, and continue chatting.


Sample custom setting #4 — chat + other task + new chat

In this example two people chat (no time limit), then they do a task, and continue chatting. However, they start a new chat log after the task, so they don’t see their messages from before the task. We also use different settings for the two stages of chat (no timer before task, 2-minute timer after task).


Sample custom setting #5 — private chat within group (A chats with B, C chats with D).

In this example there are four people in the group (A, B, C, D).

Instead of having a group chat, A chats with B, and C chats with D.


Sending and retrieving data

Matching is just the first step in any interactive online experiment — the more interesting parts are when participants can actually send their choice and messages to others. The way sending and retrieving is implemented in SMARTRIQS is very similar to how matching is implemented. In a nutshell, both sending and retrieving involves setting up a few embedded data variables in the Survey Flow, then adding the SEND or GET block after them.
To send and receive data via SMARTRIQS, first you should add the SEND and GET blocks to your survey. The recommended method is to import the Generic Interactive Survey Template (the GIST) to your Qualtrics account (see STEP II. in Getting started for importing surveys). In this template (as well as in the other demo experiments) all blocks are ‘referenced’, which means that they are automatically synchronized with the newest version in the SMARTRIQS library. This guarantees that blocks are always up to date, which is extremely helpful if a new feature is added, or in the rare case if a new bug is discovered. Also, referenced blocks and JavaScript within them cannot be edited, which prevents you from accidentally removing or editing any of the essential scripts. The other method is to directly copy+paste the JavaScript to a Qualtrics question (the source codes are available here). Since the latter method is rather error-prone, it is not recommended, unless you are setting up SMARTRIQS on your own server, or if you want to edit the JavaScript.

Tip for setting up experiments with multiple stages
Do not import the SEND or GET blocks multiple times to your survey. One cool feature of Qualtrics is that you can insert the same block several times in the Survey Flow, without having to duplicate the actual block in the Survey Editor. And since the SEND and GET blocks are fully generic, there is no need to duplicate them. Simply add them as a new element in the Survey Flow as many times as you need.
Once you have the SEND and GET blocks in your survey, the next step is to set up the embedded data variables in the Survey Flow. If you import the GIST, these embedded variables are already in the Survey Flow: you only have to assign values to them. If you are setting up a survey from scratch, you have to add the embedded data to the Survey Flow manually.


The SEND block

To keep the SEND block as simple as possible, there are only two variables that you have to specify: 1) what is the response that you want to send, and 2) what stage does it correspond to. For example, in an ultimatum game you would send the allocator’s offer in Stage 1 and the recipient’s response in Stage 2.

Required variables

sendData This is the the name of the embedded data that you want to send. Important: you should save the participant’s response to another embedded data first, and then refer to the name of that embedded data here.
sendStage Use a positive integer between 1 and numStages — The current stage.
Importantly, in SMARTRIQS each participant can send only their own responses and participants can send responses from one stage at a time. Since stages in SMARTRIQS are defined as sequential parts of the experiment, this limitation is by design. If your experiment has multiple stages, you have to add the SEND block to the Survey Flow and define embedded data variables before the SEND block multiple times.


The GET block

The GET block has more input variables than the SEND since it has to be able to retrieve multiple responses from other group members in a stage. The GET block has 3 required variables and 9 optional variables.

Required variables

getData This is the name of the role(s) whose response(s) you want to retrieve. For example, if you want to retrieve the decision of the participant in role “A”, you should put A here. You can also retrieve multiple responses in one GET block. To do so, enter the names of all roles whose responses you want to retrieve, separated by commas (no space before or after  commas!). For example, if you want to retrieve the responses of four players (roles “A”, “B”, “C”, and “D”), use A,B,C,D.
getStage Use a positive integer between 1 and numStages — The stage from which you want to retrieve the responses.
saveData This is the name(s) of the embedded data that the retrieved value(s) will be saved to. You have to create embedded data before this block, and use the name(s) of that variable. If you are retrieving multiple responses, you have to define multiple names here, separated by commas (no space before or after commas!). The number of retrieved values in getData must be the same as the number of embedded data names in saveData. If multiple values are retrieved, the first value will be saved to the first embedded data variable defined in saveData, the second retrieved value will be saved to the second embedded data variable defined in saveData, etc.


Optional variables

defaultData This is the value(s) that will be used 1) if the retrieved response is made by a BOT, or 2) if the participant whose response is retrieved failed to submit their response before the time limit expired (timed out). If you are retrieving multiple responses, you have to define multiple default values, separated by commas (no space before of after commas!). The number of retrieved values in getData must be the same as the number of embedded data names in defaultData. Default data must be defined when using bots. If default data is not defined, the survey is terminated upon timeout.
maxWaitTime Use an integer between 30 and 600. This is the maximum waiting time when retrieving responses, in seconds. If this expires, the default responses are be used. If this embedded data is not set or invalid, the value defined in the MATCH block is used. If that value is missing as well, the default waiting time is used (180 seconds).
getWaitText Specify a string: this message is displayed while participants are waiting for others. EXAMPLE

Please avoid using double quote characters (“) in this string.
If not set, there is no text displayed, only the loading animation.

operation Use one or more of the following strings: min, max, secondMax, average, sum, rank, accuracyRank, or p-BeautyRank. Note that the names of the operations are case-sensitive. If multiple operations are set, they must be separated by commas (no space before or after commas!). If this variable is set, it executes one or more mathematical operations on the retrieved data. Can be set only 1) if at least 2 responses are retrieved, and 2) if all retrieved responses are numeric. To learn more about operations, see Operations.
saveOperation This is the name(s) of the embedded data that the result(s) of operation(s) will be saved to. You have to create embedded data before this block, and use the name(s) of that variable. If you are executing multiple operations, you have to define multiple names here, separated by commas (no space before or after commas!). The number of operations in operation must be the same as the number of embedded data names in saveOperation.
decimalPlaces Use 0 or a positive integer: the number of decimals displayed in the results of operations. If this embedded data is missing or invalid, the default value is used (2 decimals).
breakTie If this is set to yes, ties in ranks will be broken randomly. This setting applies only if rank, accuracyRank, or p-BeautyRank is defined in operation. Otherwise, it will be ignored. If this embedded data is missing or invalid, ties will not be broken (e.g., if four participants score 10, 10, 9, and 9 points, their ranks will be 1, 1, 3, and 3, respectively).
targetValue This is a numeric value to which participants’ responses are compared to when calculating their accuracy-based rank. This variable is required if accuracyRank is defined in operation.
p-BeautyFraction a real number between 0 and 1, the fraction used in the p-Beauty Contest Game. This variable is required if p-BeautyRank is defined in operation.


Operations in the GET block

The built-in mathematical operations in Qualtrics are rather limited and error-prone, however, most interactive experiments require some basic operations. SMARTRIQS features 8 mathematical operations that can be executed in the GET block.

  1. min: returns the lowest value among retrieved values.
  2. max: returns the highest value among retrieved values.
  3. secondMax: returns the second-highest value among retrieved values. This operation is useful in auctions where the price is determined by the second-highest bid (e.g., Vickrey auction).
  4. average: returns the average of retrieved values. By default, averages are rounded to 2 decimals. To change decimals, set the decimalPlaces embedded data variable in the Survey Flow.
  5. sum: returns the sum of retrieved values.
  6. rank: ranks participants according to their retrieved values (e.g., score on test, number of tasks completed, etc.), where rank = 1 corresponds to the highest retrieved value, rank = 2 corresponds to the second highest retrieved value, etc. Then returns the rank of the participant.
  7. accuracyRank: ranks participants according to the absolute linear distance between their retrieved values and a target value, where rank = 1 corresponds to the smallest distance, rank = 2 corresponds to the second-smallest distance, etc. Then returns the rank of the participant. This operation is useful if you want to rank participants based on their accuracy (e.g., prediction market, guessing game). If this operation is set, the targetValue must be also defined.
  8. p-BeautyRank: ranks participatns according to the absolute linear distance between their retrieved values and the winning number in a beauty contest game, where rank = 1 corresponds to the smallest distance, rank = 2 corresponds to the second-smallest distance, etc. Then returns the rank of the participant. If this operation is set, the p-BeautyFraction must be set.

For the last three operations, you can either allow ties in ranks (default) or force breaking ties. If you want to break ties randomly, set the breakTie embedded data variable to yes.


The COMPLETE block

This is an optional block that can be inserted at the end of the survey. It has two functions:

  1. It informs the server that the participant has completed the experiment. This is useful if you use the SMARTRIQS progress monitor and want to see if participants have completed the experiment.
  2. It checks the “time out log” in Qualtrics, and if there are no issues, it writes “OK — no issues” in the time out log.

However, neither of the above functions are essential, and the COMPLETE block does not affect the interaction between participants in any way. This block simply provides more information to the researcher. In more detail: participants’ progress is automatically saved in Qualtrics, so changing participants’ status to “completed” will only matter when using the SMARTRIQS progress monitor. Similarly, the time out log automatically logs issues, which means that it will remain blank if there are no issues. Using the COMPLETE block just makes it more explicit if there are no issues, by replacing the blank entry by an “OK — no issues” message.
The COMPLETE block uses the same input variables as the MATCH block: you do not have to define any new embedded data, simply add the COMPLETE block to the end of the Survey Flow.

Randomization (roles, conditions)

Participants can be randomly assigned to treatments and roles. Randomization is flexible: researchers can either let SMARTRIQS assign treatments and roles after participants are matched in groups (Method 1, recommended) or assign treatments and roles before participants are matched in groups, by using the `Randomizer’ element in the Survey Flow. While matching is significantly faster when using Method 1, Method 2 is required if participants have to read treatment- or role-specific instructions or do treatment- or role-specific tasks before they are being matched with others. (In most experiments, however, participants can read treatment-specific instructions or complete treatment-specific tasks after they have been matched.) In addition, researchers can setup experiments with pre-defined roles (Method 3), for example, when using confederates, or when participants are assigned to roles based on some demographic characteristic (e.g., gender, political affiliation).

Method 1: letting SMARTRIQS randomize (RECOMMENDED)

To let SMARTRIQS randomize the participant’s role, simply set participantRole = random before the MATCH block.
The matching algorithm will then randomly assign roles to participants.
Similarly, if there are more than 1 condition in the experiment, set set participantCondition = random before the MATCH block. The matching algorithm will then randomly assign a condition to the group.
This method guarantees very short waiting times, since when participants join a group, their roles and condition are not determined yet. Therefore, whenever there are enough participants to form a group, a new group is created, and participants are assigned roles and conditions only after that. This guarantees that there will no more than n-1 participants waiting to be matched at any given time, where n = group size, regardless of the number of conditions. For example, even if there are 4 conditions in a 4-player game, there will be no more than 3 people waiting to be matched at any given time, since whenever 4 people are available, they immediately form a new group, assigned to the same condition, and then get their roles assigned within that group.

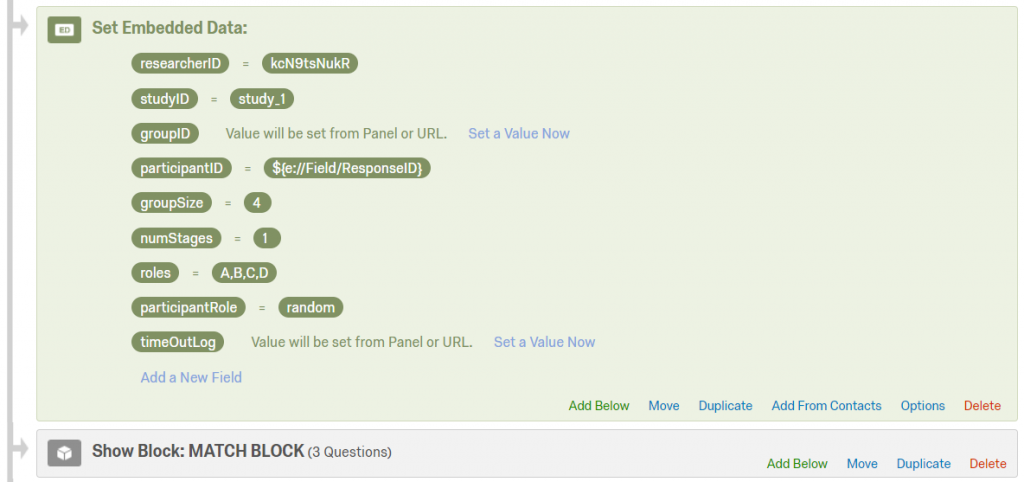
Below is a screenshot of a study with a single condition and 4 players per group, using default randomization in the MATCH block:

Note that we set participantRole = random


Method 2: randomize manually in Qualtrics

Use the Randomizer element in the Survey Flow to manually assign roles / conditions to participants. Make sure to check “Evenly present elements”.
When treatments and roles are determined in Qualtrics before matching, participants have to wait until there is at least one participant in each role, which can cause significantly longer waiting times, especially when the group size is large or when there are multiple treatments. For example, if there are 4 roles in just a single condition, it is possible that even 9 people will be waiting at the same time (3-3 people in 3 roles, 0 in the 4th role). Unless recruitment is very efficient and there are a lot of new participants, longer waiting times significantly increase attrition rates.

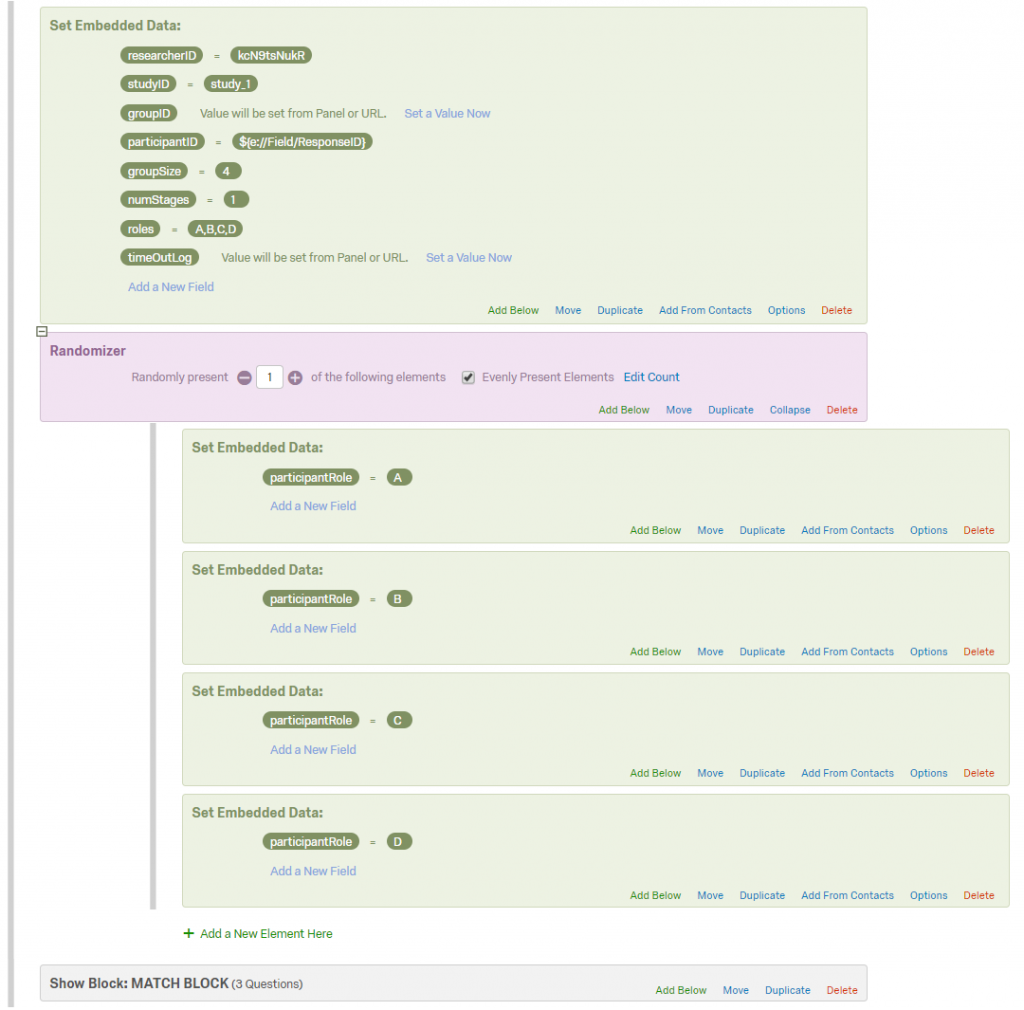
Below is a screenshot of a study with a single condition and 4 players per group, using manual randomization in Qualtrics:

Note that instead of setting participantRole = random, we used a Randomizer element in the Survey Flow, and assigned participants to one of the four roles randomly.

The screenshot taken from the progress monitor below demonstrates the issue with this method:

Even though there are already 6 participants, no groups have been created yet, since there is no one in role B (there are 3 D and 2 C players). Using the ‘Evenly present elements’ option in the Randomizer element might help, but since players can drop out during matching, that still does not guarantee that groups will be created once 4 players join.


Method 3: Using pre-defined roles

In some cases, researchers might want to assign participants to pre-defined roles, for example, if all participants are assigned to one role within a group, while the other roles are populated by confederates (research assistants), or when role assignment depends on some demographic characteristic (e.g., gender, political affiliation, etc.).

To implement such a design, the easiest solution is to utilize “URL query strings” that can be attached to any URL link.

First, open the Survey Flow editor and delete “random” from the participantRole field, so that it should read “Value will be set from Panel or URL”:

Then, when distributing the survey to participants, add “?participantRole=A” after the study URL. This indicates that everyone who opens the link will be assigned to role “A”. You can use any role name in these query strings attached after an URL, just make sure to have the role name defined in the roles field in the Survey Flow (see picture above).

To allow confederates (or the other group of participants) to join, use the same study URL, but add “?participantRole=B” instead. This indicates that eveyone who opens this version of the link will be assigned to role “B”.

For example, if the original study URL is

http://chicagobooth.az1.qualtrics.com/jfe/form/SV_abcdefg123456

(not a real link, just for demonstration), then use:

http://chicagobooth.az1.qualtrics.com/jfe/form/SV_abcdefg123456?participantRole=A

to distribute your survey to participants (or participant group 1) and

http://chicagobooth.az1.qualtrics.com/jfe/form/SV_abcdefg123456?participantRole=B

to distribute your survey to confederates (or participant group 2).

Best practices & other useful information

Running interactive studies online is always a bit challenging, but by following these guidelines, you can minimize the chance of encountering issues and you can maximize data quality.

General Recruitment

  • In general, try to recruit participants at the same time to guarantee minimal waiting times.
  • Do NOT recruit participants from panels, email lists, or other sources that are not intended for real-time interaction (e.g., Qualtrics Panels, alumni mailing lists). If participants are not starting the study around the same time, they won’t be able to interact, and the study will be terminated.
  • Recruit participants only during peak hours (e.g., between 12-9pm ET on weekdays) and pause data collection off-peak hours. Try to recruit in a short time window if possible.
  • Make it clear that your study involves real-time interaction. When you recruit participants, make sure to tell them that they will interact with others in real-time, and ask them to participate only if they can dedicate their next X minutes to your study without any interruption.
  • Pay participants a bit more than for usual (non-interactive) studies. Higher incentives decrease attrition, and low attrition rates are essential for interactive studies. For example, attrition rates are considerably lower when participants expect to earn $15-20/h, rather than the usual MTurk/Prolific wages, which range between $8-12/h.

Recruitment via MTurk & Prolific

  • IMPORTANT for MTurk users: Do NOT use third-party recruitment services (e.g., TurkPrime / CloudResearch), as these can drastically slow down recruitment speed and most participants will experience issues with matching / long waiting times.
  • If you use regular MTurk, publish small batches (e.g. 30-40 workers) every 10-15 minutes, instead of publishing large batches with several hundred workers. This will guarantee that your study will be always displayed on the first page of HITs, and you will have a steady flow of participants.
  • IMPORTANT for PROLIFIC users: Make sure to ask the Prolific support to turn off the “rate-limiter”. The rate-limiter is a system which controls the flow of participants and is designed to give priority to participants who have completed fewer studies recently (i.e., more ‘naive’ participants). This might be a desired feature for individual studies, however, for interactive designs it is a disadvantage, since it slows down recruitment and makes it difficult — if not impossible — to implement real-time interaction. In short, Prolific has a setting (hidden from researchers) that controls the speed of recruitment and who gets to see the study. The good news is that Prolific can easily turn off this rate-limiter, you just have to ask their support to do so: Send a message to their support, asking them to turn off the rate-limiter for your account. Doing so will dramatically increase recruitment and matching speeds.
  • Use the strictest eligibility filters possible (e.g., 99%+ or 100% minimum approval rate) to exclude potentially low quality responses. Note that the approval rating distribution is extremely skewed, and almost every worker is above 95%, so setting a threshold that “low” does not really filter out anyone.

Basic Qualtrics settings and survey structure

  • Hide the back button in your surveys. By default, the back button is disabled in Qualtrics studies, but make sure that the ‘Back Button’ option in ‘Survey / Survey Options’ is unchecked. Allowing participants to go back to previous questions might cause a lot of problems in interactive studies.
  • Always check “Force Response” for decisions and responses that are submitted to others, otherwise participants might leave important decisions blank or might skip responding. Missing responses are interpreted as zero.
  • Set time limits on decisions to guarantee that other participants don’t have to wait too much. Qualtrics has a question type called “Timing”, that allows you to advance participants to the next page when their time is up — you can add these timers to any page.
  • Put as much of the study in the ‘non-interactive’ introduction as possible (e.g., consent form, instructions, comprehension checks, etc.). Only match participants after they have completed these parts. Doing so ensures that only those people will be matched and start the interaction who are interested enough.
  • Keep the survey as short as possible: Studies that are shorter than 15-20 minutes have much lower attrition rates than longer studies. Compensation for interactive studies longer than 30 minutes should be substantially higher than regular wages to prevent attrition (over $20/h).

Survey Flow (embedded data and survey blocks)

  • ALWAYS change the studyID after changing any of the main parameters (number of stages, roles, conditions, or group size). Otherwise, SMARTRIQS will not be able to match participants.
  • Do NOT use special characters in names of studies, of roles, conditions or other embedded data. Use only alphanumeric characters (a-z, A-Z, 0-9), dash ( – ) and underscore ( _ ). Also, remember that the names and values of embedded data (e.g., researcher ID, study name, roles, conditions, operations, etc.) are always case sensitive.
  • Let SMARTRIQS randomize roles and conditions (instead of manual randomization in the Survey Flow). This guarantees much shorter waiting times during matching than when roles and conditions are randomized manually in Qualtrics. For more detail, see Randomization.
  • Always define the required embedded data BEFORE the MATCH, GET, SEND, or CHAT blocks. Otherwise, SMARTRIQS won’t be able to save the results in Qualtrics.
  • When you are defining the required embedded data for the SEND block, make sure to define the response you want to send first as some embedded data, and define sendData = some embedded data after that in a separate ‘Set Embedded Data’ element.

Testing, data collection, & data analysis

  • ALWAYS test your survey before collecting data and make sure that everything works as intended. Open the study URL on multiple devices and test if you can complete the study without receiving any error messages.
  • Keep track of participants’ messages, monitor their progress, and launch / stop batches whenever necessary.
    With quick responses and active management, many potential dropouts can be retained may technical or other issues arise.
  • If you are using the default server, do NOT ask participants to submit any personal information (email, name, phone, etc.), see Data Policy.
  • To make the chat logs even more user friendly, open the results in Excel, select all chat logs, then use the ‘find and replace’ tool and replace <br> and   with blank spaces.

Matching participants

SMARTRIQS offers a simple but very efficient matching algorithm. When a participant proceeds to the MATCH block, their data is transferred to the server. Then, a script checks if there is a suitable group for the participant (a group that has an open slot for the participant). If there is a suitable group, the participant is added to that group, and the participant has to wait until the group is full (until there are no more open slots left). If there aren’t any suitable groups, a new group is created, and the participant has to wait until others join and there are no more open slots left. When all slots are filled, participants in the group receive a message in Qualtrics that they have been successfully matched and can proceed to the next page of the survey. If recruitment is done properly and group size is relatively small (see Best Practices), matching is almost instantaneous and does not take more than 10 seconds on average.

By default, if a participant has to wait too long and there are not enough other participants available to fill the group, the experiment is terminated for that participant. However, SMARTRIQS gives researchers a lot of flexibility: researchers can change the maximum waiting time (the default is 3 minutes), so that they can allow participants to wait more (or less) to be matched with others. Researchers can also change how quickly inactive participants are dropped from the matching. By default, inactive participants are dropped after 10 seconds of continuous inactivity: they are removed from the database and their slot changes to ‘open’. This is to ensure that impatient participants (who enter matching but quit before they are matched) are removed. Finally, researchers can also decide to allow participants to complete the study, even if there aren’t enough people available. In this case, participants are matched with BOTs instead of termination: open slots are filled with BOTs when the participant’s waiting time reaches the maximum waiting time. To avoid deception, SMARTRIQS informs participants after matching whether they have been matched with other participants or BOTs.


The MATCH block

To match participants via SMARTRIQS, first you should add the MATCH block to your survey. The recommended method is to import the Generic Interactive Survey Template (“GIST”) to your Qualtrics account (see STEP II. in Getting started for importing surveys).

Once you have the MATCH block in your survey, the next step is to set up the embedded data parameters in the Survey Flow. If you import the GIST, these embedded variables are already in the Survey Flow: you only have to assign values to them. If you are setting up a survey from scratch, you have to add the embedded data to the Survey Flow manually.

Required parameters

There are 9 required parameters that must be defined before the MATCH block in every study:

researcherID Insert your researcher ID here.
studyID Insert the name of the study here.
groupID Leave this blank — this will be set by the matching algorithm.
participantID Use the following: ${e://Field/ResponseID} — although you can use any other random string, it is strongly recommended to use the default Qualtrics Response ID as the participant ID. This guarantees that each respondent is assigned a unique participant ID which makes identifying and tracking participants much easier.
groupSize The size of the group. Use one of these values: 2,3,4,5,6,7,8.
numStages The number of ‘stages’ (the number of decisions to be transmitted). You can use any positive integer.
roles The array of roles. EXAMPLE

For more information, see roles section in Overview.

participantRole You have two options here:
1) Set this to random. EXAMPLE2) Use one of the elements of the roles array. EXAMPLEFor more information, see Randomization.
timeOutLog Leave this blank — SMARTRIQS will save warnings and errors to this variable.

If you set up all the above embedded data parameters correctly, you should already be able to match participants. You can test this by opening the link to your survey in multiple tabs and see if you can complete the MATCH block without issues.


Optional parameters

The following are optional parameters that you can set before the MATCH block:

conditions The array of conditions. EXAMPLE

If this embedded data is not set, SMARTRIQS will treat the study as if there was only one condition.
For more information, see the conditions section in Overview

participantCondition You have two options here:
1) Set this to randomEXAMPLE2) Use one of the elements of the conditions array. EXAMPLE

For more information, see Randomization.

maxWaitTime Use an integer between 30 and 600. This is the maximum waiting time before the participant is matched with BOTs or before the experiment is terminated, in seconds. If this embedded data is not set or invalid, the default waiting time is used (180 seconds).
freezeTime Use an integer between 1 and 30. This is the minimum time that participants have to spend on the matching screen, in seconds. This guarantees that participants have sufficient time to read the notifications, even if they are matched immediately. If this embedded data is not set or invalid, the default freeze time is used (3 seconds).
botMatch If set to yes, participants are matched with BOTs when they reach the maximum waiting time during matching. If this embedded data is not set, the experiment is terminated if the participant reaches the maximum waiting time.
terminateText Specify a string: this message is displayed if they survey is terminated when there are not enough other participants available (only if botMatch is not set to yes). EXAMPLE

Please avoid using double quote characters (“) in this string. Double quotes break the script. Use single quotes ( ‘ ) instead. Default message is: “The survey has been terminated. Please contact the researcher to receive partial compensation for your participation.”

timeZone Use an integer between -12 and 12. This parameter sets the time zone (relative to UTC+0). For example, if this is set to -5, the time zone will be UTC-5 (Eastern Time Zone). If this embedded data is missing or invalid, the default time zone is used (UTC+0).
dropInactivePlayers Use an integer between 10 and 60. This is the time limit for dropping inactive players, in seconds. If this embedded is not set or invalid, the default drop limit is used (30 seconds).
loadAnimationURL Specify the URL of the image or animation to be displayed while matching. If this embedded data is not set, the default loading animation will be used.
preMatchText Specify a string: this message is displayed on the screen before participants enter the matching stage. EXAMPLE

Please avoid using double quote characters (“) in this string.
If not set, one of the following default texts is used (depending on the group size): “On the next screen, you will be matched with another participant.” OR: “On the next screen, you will be matched with … other participants.”

matchWaitText Specify a string: this message is displayed while participants are waiting for being matched. EXAMPLE

Please avoid using double quote characters (“) in this string.
If not set, the following default text is used: “We are currently trying to match you with other participant(s). Please wait patiently to be matched. This may take a few minutes. Please do NOT minimize this window or navigate to another page.”

matchAlert Set this to yes to display a notification in the notification bar of the browser (see here) that informs participants if they are successfully matched. This can be very useful because participants will see this notification even if they navigate to a different tab while waiting to be matched. If this parameter is not set, there is no notification by default.


Tip for testing your surveys
Make sure to turn off (un-check) “Save and Continue” and “Prevent Ballot Box Stuffing” in Survey Options. Otherwise, Qualtrics won’t let you open the survey multiple times on the same computer. Of course, you should turn these back on before you start collecting actual data to prevent duplicate responses.

Overview of basic concepts

Embedded data. Embedded data are variables and parameters defined (or calculated) in the Qualtrics Survey Flow. Embedded data serve several functions in SMARTRIQS: they define study parameters, store participant information, decisions and results of operations. Embedded data are highlighted in this documentation: sample embedded data. Whenever you see this format, it refers to embedded data.

Blocks. Blocks refer to survey blocks in Qualtrics, which you can edit in the survey editor and rearrange in the Survey Flow. SMARTRIQS uses survey blocks (and JavaScript within them) to establish communication between the respondents and the server. There are three blocks that are required in each interactive survey: MATCH, SEND, and GET. In addition to these three blocks, there are two optional blocks: COMPLETE and CHAT.

Study. Study refers to an experiment with specific study parameters (see below). When you modify any of these study parameters, you should also rename the study, and give it a new studyID. Otherwise, if you modify study parameters and try to run the modified study under the same studyID, you will receive an error message during matching.

Study parameters. These are the parameters that are the same for every participant in the experiment. In other words, these parameters are not determined on the individual level, but on the study level. Study parameters are the following: study name, group size, number of stages, conditions, roles, and some other technical parameters that define the time zone, maximum waiting times, etc.

Study name. studyID A unique string assigned to a study. Values

Group size. groupSize The number of participants per group. Values

Number of stagesnumStages The number of stages of the study. Values

Conditions. conditions The array of all possible conditions in a study (not the participant’s specific condition). Values

Roles. roles The array of all possible roles in a study (not the participant’s specific role). Values

Group. Refers to a group of  2-8 participants who are directly interacting with each other during the experiment. Groups in a study must have the same groupSize. In SMARTRIQS, group size is limited to 8 participants per group. Within each study, each group has a unique groupID, that reflects the chronological order in which groups were created: 1 = first group, 2 = second group, etc. groupID is assigned automatically in the MATCH block.

Stage. A stage refers to a part of the experiment during which 1) one participant makes a decision while others in the group are waiting, or 2) multiple participants are making decisions simultaneously. If participants are taking turns (decisions are sequential), each turn is treated as a separate stage. The total number of separates stages is the “number of stages” in an experiment: numStages 

Conditions (or treatments). Conditions are versions of an experiment with the same studyID, which means that the study parameters must be the same across conditions: conditions must have the same number of participants per group, the same roles, and the same number of stages. Conditions can differ in instructions, experimental stimuli, or parameters that are randomized at the individual level, so basically anything that does not affect group size, roles, and the number of stages. Conditions are optional: by default, there is only one “condition” in each SMARTRIQS survey.

Roles (or players). Roles refer to the participants’  roles within groups. Each participant must be assigned a unique role within the group, even if roles do not have any function in the experimental design (for example, when everyone within a group has the same task: public goods game, auction, competition, etc.). This is because unique roles within groups allow SMARTRIQS to identify participants and to submit or retrieve their data from the database. Recommended roles

Progress monitor (LINK)

Researchers can also monitor data collection in real-time using the SMARTRIQS progress monitor. The progress monitor shows essential information about groups (group number, condition, group status and progress) and participants (role, ID, last activity, responses) in a simple and concise way. The progress monitor also allows researchers to download data from the server (this is mostly for testing purposes—as all data is saved directly in Qualtrics as well).

See a sample screenshot below:

You can access the progress monitor here.

Then, enter your researcherID and the studyID associated with the study you want to monitor.

Managing bots, inactive players and dropouts

SMARTRIQS offers flexibility in handling inactive participants and dropouts. You can choose from three options:

1. Bots and default responses

This method uses bots and default responses to fill missing roles and missing responses, whenever participants exceed the maximum waiting time (specified by the maxWaitTime parameter), ensuring that every participant can complete the study, even if there are not enough other participants available within the maximum waiting time. You can specify default responses for bots in the Survey Flow (see the examples below)—these can be stochastic as well, or depend on previous decisions.

EXAMPLE 1: fixed default
Generate a fixed response of 50:

EXAMPLE 2: random default response
Generate a random response between 0 and 100:

EXAMPLE 3: dynamic default response
Generate a response based on other variables:

EXAMPLE 4: multiple default responses
Generate random responses between 0 and 100 for 4 players:
Note that responses are separated by commas

To avoid any deception, participants are always notified whether they have been matched with other participants or bots (or some combination thereof), and they also receive notifications whenever a response is a default response (as opposed to a `real’ response). For example:

To set up a study that allows for bots and default responses, set botMatch = yes before the MATCH block, and define defaultData before every GET block.


2. Default responses only

The second option does not allow participants to be matched with bots but uses default responses whenever someone becomes inactive or drops out in a later stage. If there are not enough other participants available during matching, the survey is terminated. However, if a participant becomes inactive in a later stage, the study continues and the timed out participant’s response is replaced by the default response. In this case, both the timed out participant and the other group members are notified about the timeout and that the default response has been applied. If the timed out participant becomes active again, they can still submit their responses in subsequent stages and complete the study. SMARTRIQS automatically creates a log file (timeOutLog) detailing which participant has timed out in which stage, allowing researchers to decide later whether to keep or exclude their data.

To set up a study that does not allows for bots but allows for default responses, leave the botMatch parameter blank before the MATCH block, but define defaultData before every GET block.

If a study is terminated, the participant receives the following message by default: “The survey has been terminated. Please contact the researcher to receive partial compensation for your participation.” You can use any custom text by defining the terminateText parameter before the MATCH block. You can also include dynamic variables, such as completion codes in these messages.


3. No bots or default responses

The third option is the most conservative as it does not allow for using either bots or default responses. If there are not enough participants available during matching, or if any of the participants time out, the survey is immediately terminated for everyone in the group. Termination is logged in Qualtrics, and the researcher can specify a custom survey termination message with a partial survey completion code, should the participants receive partial compensation for their participation.

To set up a study without bots or default responses, leave the botMatch parameter blank before the MATCH block, and omit defaultData before every GET block (you can either delete or leave blank the defaultData embedded data in the Survey Flow).


Getting started

STEP 0.

SMARTRIQS runs in Qualtrics. If you have never used Qualtrics before, here is an amazing 10-minute video tutorial by Dare McNamara, in which she explains how to use the basic features of Qualtrics. For more advanced features (such as survey logic, survey flow, piped text, etc.), you can watch her other tutorial video here. If you have used Qualtrics before, go to STEP I.


STEP I. Get your SMARTRIQS researcher ID

Before you start designing your own interactive studies, you will need a researcher ID. The researcher ID is a unique 10-digit ID that allows the SMARTRIQS server to communicate with your Qualtrics surveys.
To obtain a researcher ID, open this link and complete the sign-up form.


STEP II. Import your first SMARTRIQS survey

1. Download a .QSF file (survey template) from the OSF repository. This repository contains the survey templates for most demo experiments. If you want to design a study that is very different from these templates, download the “Generic Interactive Survey Template (GIST)”.

2. Log in to your Qualtrics account. Click on “Create new project / Create your own / Survey / From a File”, then click on “Choose file” and then select one of the .QSF files you just downloaded. Finally, name your project and click “Get Started”.

3. Qualtrics will automatically open your new project. This may take a few seconds. After the survey has loaded, open the survey flow. On the top of the survey flow you will see two embedded data variables that are not set yet: researcherID and studyID

Click on “Set a Value Now” next to researcherID and enter your smartriqs researcher ID (the one you obtained in STEP I). Click on “Set a Value Now” next to studyID and enter a name for your study. This can be anything, but each of your surveys should have a different name (studyID) and you should use only alphanumeric characters (a-z, A-Z, 0-9), dash (-) or underscore (_). Suggested study names. Then click on “Save Flow”,  “Publish”, and “Publish”.

4. After a few seconds you will see a “Survey Activated” message with a link. Use this link to test your imported study. You should be able to start and complete the study now.

Repeat the above steps to import and launch new surveys (.QSF files).


STEP III. Create your own custom experiments

Before you create your first custom experiment, please visit the “Overview” section of the documentation.